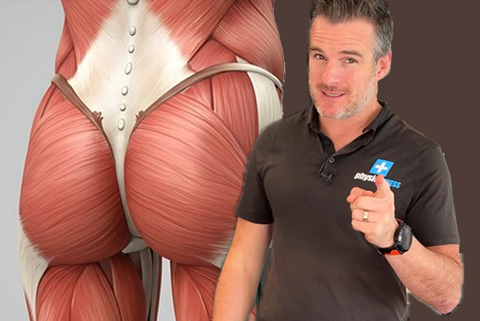
How to Activate Your Glutes
3 Beginner Exercises to Improve Glute Contraction, Strength and Hip Control
by Tim Keeley05 Aug 2026


As featured in The Daily Telegraph, Herald Sun and other News Corp publications around Australia.
Do you perform bridges, squats and hip thrusts but still struggle to feel your glutes working?
You may have heard this described as having “lazy glutes” or glutes that are not “switching on”. These phrases are commonly used in fitness and rehabilitation, but they do not mean that your gluteal muscles have literally stopped working.
A more accurate explanation is that the muscles may not be contracting strongly enough, recruiting at the right time, coordinating effectively with the other muscles around the pelvis and lower limb, or tolerating the load being placed on them.
When this happens, you may find that your hamstrings, quadriceps or lower back dominate movements that should involve more contribution from the muscles around your hips and buttocks.
In this article, I will explain what people really mean when they talk about lazy glutes and show you three entry-level exercises that can help improve:
Gluteal muscle contraction
Neuromuscular drive and coordination
Hip extension
Hip external rotation
Pelvic stability
Single-leg hip and knee control
Base-level gluteal strength
These exercises are designed for beginners, people returning from an injury and anyone who has weakness or difficulty deliberately contracting the appropriate muscles.
They are a starting point rather than a complete strength program. Once you can perform them correctly, they should be progressed to heavier and more challenging exercises.
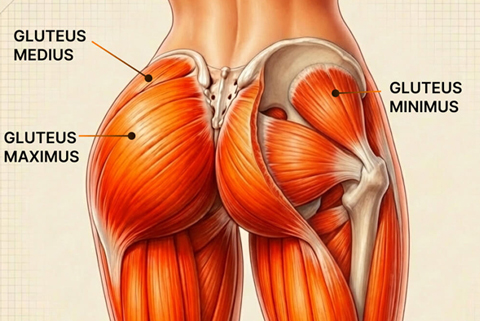
Gluteus maximus is the largest and most visible of the gluteal muscles. It is a powerful hip extensor and contributes to movements such as standing up, climbing stairs, running, jumping, lifting and driving the thigh backwards.
However, the gluteal region contains three main gluteal muscles:
Gluteus maximus
Gluteus maximus is the largest of the three. It is particularly important for hip extension and contributes to external rotation and control of the pelvis.
Gluteus medius
Gluteus medius is positioned around the outer part of the hip. It plays an important role in hip abduction, pelvic stability and control of the thigh and knee during single-leg activities.
Gluteus minimus
Gluteus minimus sits beneath gluteus medius. It assists with hip abduction, rotation and control of the pelvis and hip joint.
There is also a group of smaller muscles located deeper around the back of the hip. These deep hip external rotators include the piriformis, obturator internus, obturator externus, superior and inferior gemelli, and quadratus femoris.
Together, the gluteal muscles and deeper hip muscles help produce and control movement of the thigh and pelvis when you walk, run, squat, climb stairs or balance on one leg.
This is why glute training should not be limited to hip thrusts and bridges.
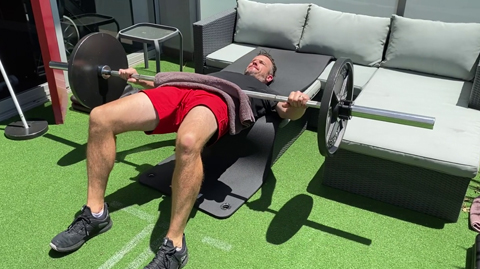
However, hip extension is only one aspect of hip and gluteal function.
A more accurate explanation is that the muscles may not be contracting strongly enough, recruiting at the right time, coordinating effectively with the other muscles around the pelvis and lower limb, or tolerating the load being placed on them.
A more complete program may also need to address:
Hip external rotation
Hip abduction
Pelvic stability
Single-leg control
Knee alignment
Single-leg hip and knee control
Strength in weight-bearing positions
Someone may be relatively strong during a double-leg hip thrust but still have difficulty controlling their pelvis and knee while standing, stepping, running or landing on one leg.
The following three exercises address different components of hip function.
The clam focuses on external rotation. The prone leg lift focuses on gluteus maximus contraction during hip extension. The one-leg wall sit then introduces abductor and external-rotation control in a weight-bearing position.
When we use an exercise to “activate” a muscle, we are generally trying to improve the person’s ability to:
Deliberately contract the intended muscle
Increase neuromuscular drive to that muscle
Coordinate its contraction with other muscles
Maintain the contraction during movement
Develop enough base strength to progress safely
The aim of these first three exercises is therefore not to develop maximum strength.
They are low-level exercises that allow you to slow the movement down, concentrate on the muscular contraction and establish control before progressing to heavier resistance and more demanding functional exercises.
What does the clam target?
The clam trains hip external rotation—the action of rotating the thigh outwards.
Many people describe the clam simply as a glute exercise, but it is better understood as an exercise for the hip external-rotation system.
This system includes contributions from the gluteal muscles and the smaller external rotators located deeper around the back of the hip.
The clam is a useful entry-level exercise for someone who:
Has weakness around the hip
Has difficulty deliberately contracting the hip muscles
Is returning from an injury
Loses hip or knee control during harder exercises
Cannot yet tolerate more demanding weight-bearing exercises
Watch: How to perform the clam
How many should you do?
Start with:
10–12 controlled repetitions on each side
2–3 sets
Begin without a resistance band if you find the exercise difficult. Once you can complete the movement without rolling your pelvis backwards, you can place a light resistance band above your knees.
What should you feel?
You should feel the muscles around the back and outer part of the hip working.
You should not experience sharp pain in the hip, groin, knee or lower back.
Common clam mistake
Do not roll your body backwards to lift your knee higher.
A smaller movement performed with a strong heel squeeze, deliberate glute contraction and stable pelvis is more useful than a larger movement created by twisting your body.
Many people describe the clam simply as a glute exercise, but it is better understood as an exercise for the hip external-rotation system.
This system includes contributions from the gluteal muscles and the smaller external rotators located deeper around the back of the hip.
The clam is a useful entry-level exercise for someone who:
Has weakness around the hip
Has difficulty deliberately contracting the hip muscles
Is returning from an injury
Loses hip or knee control during harder exercises
Cannot yet tolerate more demanding weight-bearing exercises
What does the prone leg lift target?
The prone leg lift targets gluteus maximus through hip extension—the action of moving the thigh backwards.
Gluteus maximus plays an important role in movements such as:
Standing up from a chair
Climbing stairs
Walking uphill
Running
Jumping
Lifting
Returning to an upright position after bending forwards
This entry-level exercise teaches you to produce hip extension by contracting gluteus maximus without excessively relying on your hamstrings or arching your lower back.
It can be particularly helpful for people who feel that their hamstrings or lower back perform most of the work during bridges, hip thrusts and other hip-extension exercises.
Watch: How to perform the prone leg lift
How many should you do?
Start with:
10–12 controlled repetitions on each side
2–3 sets
The leg only needs to lift a short distance.
The purpose is to achieve a deliberate gluteus maximus contraction—not to lift your foot as high as possible.
What should you feel?
You should feel the main contraction in your buttock.
Some hamstring activity is normal because the hamstrings also assist with hip extension. However, the movement should not be dominated by discomfort or tension in your lower back.
Common prone leg lift mistake
The most common mistake is lifting the leg too high and arching the lower back.
Reduce the height of the lift, gently brace your trunk and think about squeezing your buttock before your foot leaves the floor.
The quality of the contraction is more important than the height of the movement.
What does the one-leg wall sit target?
The one-leg wall sit introduces hip abduction and external-rotation control in a standing position, with an emphasis on gluteus medius and the surrounding hip muscles.
These muscles help keep the pelvis level and control the position of the thigh and knee when your body weight is supported on one leg.
This is important during:
Walking
Running
Stair climbing
Step-ups
Lunging
Single-leg squatting
Jumping and landing
Changing direction during sport
Although the one-leg wall sit remains a relatively low-level exercise, it is more functional than the first two because the muscles must work while supporting your body weight.
Watch: How to perform the one-leg wall sit
How many should you do?
Begin with an isometric hold:
Hold for 10–30 seconds
Repeat 2–3 times on each side
As your control and endurance improve, progress from holding the position to performing controlled up-and-down mini-squat movements. Once you can complete the movement without rolling your pelvis backwards, you can place a light resistance band above your knees.
Aim for:
8–12 controlled movements
2–3 sets on each side
What should you feel?
You should feel muscular effort around the outer hip and buttock of the standing leg.
Both hips contribute to the exercise, but the gluteus medius on the standing side has an important role in controlling the position of your pelvis, thigh and knee.
Common one-leg wall sit mistake
Do not allow the knee of the standing leg to collapse inwards.
Also avoid allowing your pelvis to drop or rotate.
If you cannot maintain your alignment, reduce the depth of the wall sit and begin with a shorter hold.
They are most appropriate for people who are:
Just beginning a glute-strengthening program
Returning from an injury or operation
Experiencing weakness or poor muscular control
Struggling to feel the intended muscles contracting/li>
Unable to maintain good alignment during harder exercises
If you have persistent pain, substantial weakness or difficulty progressing beyond these exercises, a physiotherapist can assess the complete problem rather than assuming your glutes are the only cause.
They may also be used as part of a warm-up before a lower-body strength session.
However, repeatedly performing low-level activation exercises will eventually stop providing enough stimulus to make you stronger.
Once you can easily complete the recommended repetitions and maintain good technique, progress the resistance, duration or difficulty rather than simply continuing to add more repetitions.
However, pain and injury are rarely caused by one weak muscle alone.
Symptoms may also be affected by:
Training load
Joint mobility
Previous injury
Movement technique
Overall lower-limb strength
Work and daily activity
Recovery and sleep
The capacity of muscles and tendons to tolerate load
If you have persistent pain, substantial weakness or difficulty progressing beyond these exercises, a physiotherapist can assess the complete problem rather than assuming your glutes are the only cause.
Persistent hip, groin, knee or lower-back pain
Sharp pain during any of these exercises
Significant weakness on one side
Difficulty standing or balancing on one leg
A knee that repeatedly collapses inwards
Pain that is getting worse rather than improving
Symptoms following a recent injury or operation
Numbness, pins and needles or pain travelling down the leg
A Physiotherapist can assess your strength, movement, joint mobility and exercise technique before creating a progression specific to your condition and goals.
“Lazy glutes” is not a medical diagnosis. It commonly describes difficulty recruiting, coordinating or developing sufficient strength through the hip muscles.
Hip thrusts and bridges are useful, but they primarily emphasise hip extension. A complete approach should also develop external rotation, abduction and single-leg control.
The clam, prone leg lift and one-leg wall sit are low-level exercises designed to improve muscular contraction, coordination and base strength.
Once you can perform them correctly, progress to more demanding resistance and functional exercises to continue building strength.
Book a Physiotherapy consultation to assess your hip strength, lower-limb control and exercise technique.
For people who cannot attend the clinic, Physio Rehab provides structured online injury, surgery, mobility and strengthening programs supported by an extensive physiotherapy exercise-video library.
With more than 25 years of clinical experience and over 20,000 treatments performed, Tim specialises in sports, fitness and post-operative rehabilitation.
He is also the founder of Physio Rehab, an online platform offering structured rehabilitation programs, professional education and an extensive physiotherapy exercise-video library. Tim’s physiotherapy and exercise content is followed by more than 250,000 YouTube subscribers.
👉 Book your consultation today or call us on (02) 9389 9100 to start your recovery.
You may have heard this described as having “lazy glutes” or glutes that are not “switching on”. These phrases are commonly used in fitness and rehabilitation, but they do not mean that your gluteal muscles have literally stopped working.
A more accurate explanation is that the muscles may not be contracting strongly enough, recruiting at the right time, coordinating effectively with the other muscles around the pelvis and lower limb, or tolerating the load being placed on them.
When this happens, you may find that your hamstrings, quadriceps or lower back dominate movements that should involve more contribution from the muscles around your hips and buttocks.
In this article, I will explain what people really mean when they talk about lazy glutes and show you three entry-level exercises that can help improve:
They are a starting point rather than a complete strength program. Once you can perform them correctly, they should be progressed to heavier and more challenging exercises.
What Are the Gluteal Muscles?
When most people talk about their “glutes”, they are usually thinking about the gluteus maximus.Gluteus maximus is the largest and most visible of the gluteal muscles. It is a powerful hip extensor and contributes to movements such as standing up, climbing stairs, running, jumping, lifting and driving the thigh backwards.
However, the gluteal region contains three main gluteal muscles:
Gluteus maximus
Gluteus maximus is the largest of the three. It is particularly important for hip extension and contributes to external rotation and control of the pelvis.
Gluteus medius
Gluteus medius is positioned around the outer part of the hip. It plays an important role in hip abduction, pelvic stability and control of the thigh and knee during single-leg activities.
Gluteus minimus
Gluteus minimus sits beneath gluteus medius. It assists with hip abduction, rotation and control of the pelvis and hip joint.
There is also a group of smaller muscles located deeper around the back of the hip. These deep hip external rotators include the piriformis, obturator internus, obturator externus, superior and inferior gemelli, and quadratus femoris.
Together, the gluteal muscles and deeper hip muscles help produce and control movement of the thigh and pelvis when you walk, run, squat, climb stairs or balance on one leg.
This is why glute training should not be limited to hip thrusts and bridges.
Why Hip Thrusts Alone May Not Be Enough
Hip thrusts, bridges and deadlifts are valuable exercises. They train hip extension and can develop significant strength through gluteus maximus.However, hip extension is only one aspect of hip and gluteal function.
A more accurate explanation is that the muscles may not be contracting strongly enough, recruiting at the right time, coordinating effectively with the other muscles around the pelvis and lower limb, or tolerating the load being placed on them.
A more complete program may also need to address:
The following three exercises address different components of hip function.
The clam focuses on external rotation. The prone leg lift focuses on gluteus maximus contraction during hip extension. The one-leg wall sit then introduces abductor and external-rotation control in a weight-bearing position.
What Does “Activating” or “Switching On” Your Glutes Mean?
“Glute activation” is a popular term, but muscles are not usually completely on or off.When we use an exercise to “activate” a muscle, we are generally trying to improve the person’s ability to:
They are low-level exercises that allow you to slow the movement down, concentrate on the muscular contraction and establish control before progressing to heavier resistance and more demanding functional exercises.
Exercise 1: The Clam
What does the clam target?
The clam trains hip external rotation—the action of rotating the thigh outwards.
Many people describe the clam simply as a glute exercise, but it is better understood as an exercise for the hip external-rotation system.
This system includes contributions from the gluteal muscles and the smaller external rotators located deeper around the back of the hip.
The clam is a useful entry-level exercise for someone who:
Watch: How to perform the clam
|
|
- Lie on your side with your hips and knees bent and your feet together.
- Position your shoulders, hips and pelvis so they are stacked vertically.
- Gently brace your abdominal muscles to keep your lower back and pelvis still.
- Top tip: Squeeze your heels together before moving. This can help increase recruitment and contraction around the gluteal and external-rotator muscles.
- Clench your buttocks together—or “squeeze your glutes”—to begin raising the top knee towards the ceiling.
- Concentrate more on the heel squeeze and gluteal contraction than on how high you can lift the thigh.
- Pause briefly at the top and focus on maintaining the muscular contraction.
- Lower the knee slowly and with control.
How many should you do?
Start with:
10–12 controlled repetitions on each side
2–3 sets
Begin without a resistance band if you find the exercise difficult. Once you can complete the movement without rolling your pelvis backwards, you can place a light resistance band above your knees.
What should you feel?
You should feel the muscles around the back and outer part of the hip working.
You should not experience sharp pain in the hip, groin, knee or lower back.
Common clam mistake
Do not roll your body backwards to lift your knee higher.
A smaller movement performed with a strong heel squeeze, deliberate glute contraction and stable pelvis is more useful than a larger movement created by twisting your body.
Many people describe the clam simply as a glute exercise, but it is better understood as an exercise for the hip external-rotation system.
This system includes contributions from the gluteal muscles and the smaller external rotators located deeper around the back of the hip.
The clam is a useful entry-level exercise for someone who:
Exercise 2: Prone Leg Lift
What does the prone leg lift target?
The prone leg lift targets gluteus maximus through hip extension—the action of moving the thigh backwards.
Gluteus maximus plays an important role in movements such as:
This entry-level exercise teaches you to produce hip extension by contracting gluteus maximus without excessively relying on your hamstrings or arching your lower back.
It can be particularly helpful for people who feel that their hamstrings or lower back perform most of the work during bridges, hip thrusts and other hip-extension exercises.
Watch: How to perform the prone leg lift
|
|
- Lie face down with both legs straight.
- Rest your forehead on your hands so your neck remains relaxed.
- Gently tighten your abdominal muscles and keep your pelvis in a neutral position so you are not arching your lower back.
- Contract the buttock muscle on one side before beginning the movement.
- Keep your knee straight and your kneecap facing the floor.
- Lift the leg a small distance from the floor.
- Stop before your lower back arches or your pelvis begins to rotate.
- Pause for one to two seconds before slowly returning the leg to the floor.
- Repeat the exercise on the opposite side.
How many should you do?
Start with:
10–12 controlled repetitions on each side
2–3 sets
The leg only needs to lift a short distance.
The purpose is to achieve a deliberate gluteus maximus contraction—not to lift your foot as high as possible.
What should you feel?
You should feel the main contraction in your buttock.
Some hamstring activity is normal because the hamstrings also assist with hip extension. However, the movement should not be dominated by discomfort or tension in your lower back.
Common prone leg lift mistake
The most common mistake is lifting the leg too high and arching the lower back.
Reduce the height of the lift, gently brace your trunk and think about squeezing your buttock before your foot leaves the floor.
The quality of the contraction is more important than the height of the movement.
Exercise 3: One-Leg Wall Sit
What does the one-leg wall sit target?
The one-leg wall sit introduces hip abduction and external-rotation control in a standing position, with an emphasis on gluteus medius and the surrounding hip muscles.
These muscles help keep the pelvis level and control the position of the thigh and knee when your body weight is supported on one leg.
This is important during:
Watch: How to perform the one-leg wall sit
|
|
- Stand side-on to a wall, close enough for the knee nearest the wall to make contact with it.
- Lift the leg closest to the wall and bend the hip and knee.
- Gently brace your abdominal muscles to keep your lower back and pelvis still.
- Press the outside of the lifted knee gently but firmly into the wall.
- Balance on the outside leg.
- Bend your standing hip and knee slightly, moving into a shallow one-leg squat or wall-sit position.
- Keep your pelvis level and your standing knee pointing over the middle of your foot.
- Maintain pressure into the wall while holding the position.
- Keep breathing normally throughout the exercise.
How many should you do?
Begin with an isometric hold:
Hold for 10–30 seconds
Repeat 2–3 times on each side
As your control and endurance improve, progress from holding the position to performing controlled up-and-down mini-squat movements. Once you can complete the movement without rolling your pelvis backwards, you can place a light resistance band above your knees.
Aim for:
8–12 controlled movements
2–3 sets on each side
What should you feel?
You should feel muscular effort around the outer hip and buttock of the standing leg.
Both hips contribute to the exercise, but the gluteus medius on the standing side has an important role in controlling the position of your pelvis, thigh and knee.
Common one-leg wall sit mistake
Do not allow the knee of the standing leg to collapse inwards.
Also avoid allowing your pelvis to drop or rotate.
If you cannot maintain your alignment, reduce the depth of the wall sit and begin with a shorter hold.
These Glute Exercises Are a Starting Point
These three exercises are deliberately entry-level.They are most appropriate for people who are:
How Often Should You Perform These Exercises?
For someone beginning a glute-strengthening program, these exercises can generally be performed three to four times per week.They may also be used as part of a warm-up before a lower-body strength session.
However, repeatedly performing low-level activation exercises will eventually stop providing enough stimulus to make you stronger.
Once you can easily complete the recommended repetitions and maintain good technique, progress the resistance, duration or difficulty rather than simply continuing to add more repetitions.
Can Weak Glutes Cause Hip, Knee or Back Problems?
Gluteal weakness or poor hip control can be one contributing factor in some hip, knee and lower-back presentations.However, pain and injury are rarely caused by one weak muscle alone.
Symptoms may also be affected by:
When Should You See a Physiotherapist?
Seek professional assessment if you experience:Key Takeaways
Your glutes are not one muscle. They include gluteus maximus, gluteus medius and gluteus minimus, supported by a group of deeper muscles that help rotate and control the hip.“Lazy glutes” is not a medical diagnosis. It commonly describes difficulty recruiting, coordinating or developing sufficient strength through the hip muscles.
Hip thrusts and bridges are useful, but they primarily emphasise hip extension. A complete approach should also develop external rotation, abduction and single-leg control.
The clam, prone leg lift and one-leg wall sit are low-level exercises designed to improve muscular contraction, coordination and base strength.
Once you can perform them correctly, progress to more demanding resistance and functional exercises to continue building strength.
Need Help With Hip, Knee or Glute Weakness?
If pain, weakness or poor lower-limb control is stopping you from exercising, running or returning to sport, our Physiotherapists at Physio Fitness in Bondi Junction can assess the cause and develop a personalised rehabilitation plan.Book a Physiotherapy consultation to assess your hip strength, lower-limb control and exercise technique.
For people who cannot attend the clinic, Physio Rehab provides structured online injury, surgery, mobility and strengthening programs supported by an extensive physiotherapy exercise-video library.
About Tim Keeley
Tim Keeley, B.Phty, Cred.MDT, APAM, is the founder and Principal Physiotherapist of Physio Fitness, a sports injury and rehabilitation clinic in Bondi Junction, Sydney.With more than 25 years of clinical experience and over 20,000 treatments performed, Tim specialises in sports, fitness and post-operative rehabilitation.
He is also the founder of Physio Rehab, an online platform offering structured rehabilitation programs, professional education and an extensive physiotherapy exercise-video library. Tim’s physiotherapy and exercise content is followed by more than 250,000 YouTube subscribers.
Important
These exercises provide general information and are not a substitute for individual medical or physiotherapy advice. Stop if an exercise causes sharp or increasing pain. Anyone recovering from an injury or operation should follow the advice of their treating physiotherapist, doctor or surgeon.👉 Book your consultation today or call us on (02) 9389 9100 to start your recovery.
B.Phty, Cred MDT, APAM
Principal Physiotherapist
Principal Physiotherapist